Thursday, April 1, 2010

Rugalach

Hey everyone! I have two upcoming tutorials that have nothing to do with Sherry Yard or her book or my pastry project for that matter. I was just thinking about how I do in fact spend a lot of my free time baking, just not necessarily things from the pastry project (that I have not continued with YET but I will). So this week I was making Rugalach for my mom's birthday party and thought I'd share them with you.

This recipe is adapted from a Martha Stewart Rugalach recipe and since it has been altered from her original recipe, I feel comfortable posting it here. I normally do not post recipes exactly as shown in the books out of respect for copyright laws and respect for the chefs!

For those of you who are not familiar with them, Rugalach are a Polish cookie very popular in the deli's of New York. They are often associated with Jewish bakeries, as there is a huge Jewish-Polish population in America. They are basically a crescent cookie made with a flaky crust, filled with whatever you want (typically jelly, chocolate, and nuts). This recipe is a very traditional Walnut/Chocolate chip with a light layer of Apricot jelly.

Warning: these take LOTS of time. I made a double recipe and it took me 5 hours from start to finish. Make sure you have time for the dough to chill for atleast an hour before you begin.

To start, cream your butter and cream cheese in the mixer with the paddle attachment (cream means beat on medium to high for about 5 minutes).


With the mixer running on very low, add 1/2 cup of the sugar (save the other 1/4 cup for later), egg yolks, salt and vanilla extract. Mix on medium speed for about thirty seconds, stop mixer and scrape down sides of bowl. Mix again for another minute, until all is incorporated. Do not overmix. Add the flour and mix on low until combined.

Try not to get your mixer as dirty as mine is!

Next, remove the dough from the mixer bowl and portion into three equal parts. The best way to do this is to measure the entire ball of dough on a scale and divide that number by three. Then weigh out that amount and form the three equal parts into balls. Pat the balls down with the palm of your hand to make them flat. This will make them easier to roll out later.

The one in the back right corner is patted down flat. I made a double recipe which is why I have six balls of dough in the picture. Each ball of dough will make 16 pieces of Rugalach. (These freeze wonderfully).

Wrap up the dough individually and refrigerate for one hour. While it is chilling, make the filling.

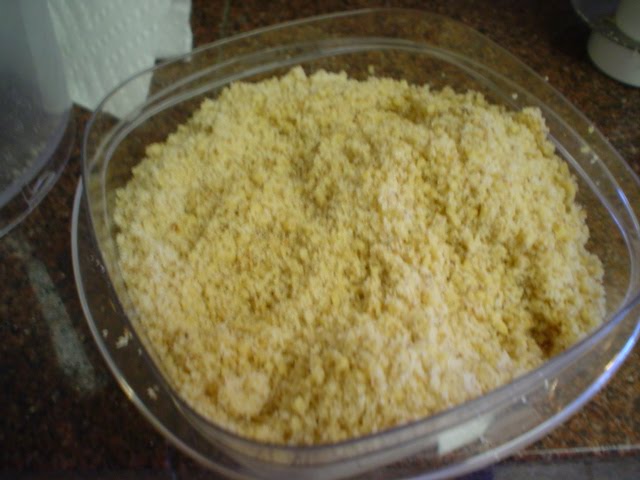
Combine walnuts, ground cinnamon, and the remaining 1/4 cup sugar in a food processor and pulse till nuts are completely ground. Set aside.


Once the dough is chilled (do not overchill, it will become hard to roll out - if that happens, let thaw on counter for 20 minutes or so) remove from fridge and place on floured mat or cutting board. I have found that the less stingy I am with flour, the easier of a time I have. I used to be very stingy with flour and then took a job which required me to roll out atleast 4 pies a day. I have now learned the easy way to roll dough!

Lightly flour the top of the dough, and begin with the rolling pin in the center of the ball. Roll the pin away from you across the top of the dough, pressing down gently. Turn the dough 90 degrees and repeat, always rolling in the same direction. After every roll, remember to turn the dough 90 degrees in the same direction. Repeat until dough is approximately 10 inches in diameter. Be sure to roll all the way out to the edges. This is different from pie doughs where you stop before you get to the edges (that is why pie crust is so thick at the edge). You want an even thickness throughout the dough. As you are turning the dough and rolling, add more flour as necessary to your work surface so the dough does not stick.


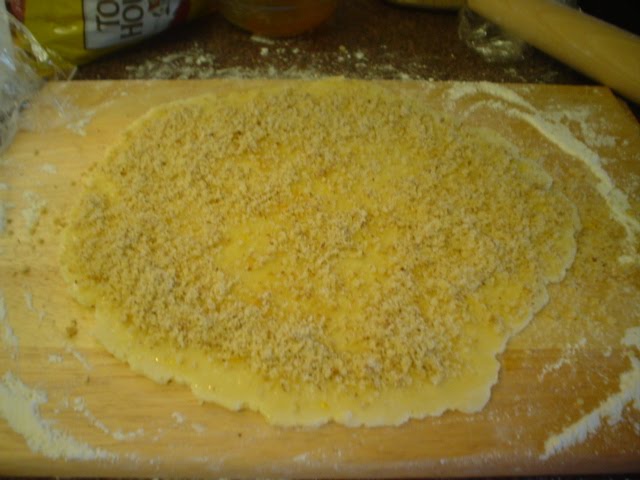
Take your apricot jelly and add a minimal amount of water to it (approx 1 Tablespoon water to every 3 Tablespoons Jelly). Heat over the stove to liquefy the jelly as much as possible. Take a pastry brush and brush the top surface of the dough with a light layer of jelly.


Then evenly distribute one third of the chocolate chips (approx 2/3 cup) on the surface and press down gently.

Next sprinkle one third of the ground walnut filling over the chips and press down again - gently. (I did these steps backwards as you can see in the picture, but do as I say and not as I do - it will work better for you and will be less sticky!).


Take a pastry wheel (pizza cutter) and cut in half one way, then in half again going the other direction. You should now have four even pieces. Slice each piece twice more diagonally to get 16 even wedges. HINT: it helps if in between slicing you lightly flour the pastry wheel so the jelly doesnt stick and cause a big mess.

Working from the outside of the circle in, roll up the crescents, making sure to tuck in all renegade chocolate chips. Make sure the thin tip of the crescent is pressed into the dough slightly or tucked underneath the finished crescent.


Repeat with remaining 2 balls of dough. Beat the whole egg in a small dish and brush this egg over the tops of the rugalach. Combine approximately 1 T cinnamon to 1 cup of granulated sugar and sprinkle on top of egg-washed-rugalach.


Bake on a cookie sheet sprayed with Pam or lined with parchment paper. Bake at 350 for 22-25 minutes or until evenly browned. Check for doneness by carefully lifting one up and seeing if it is golden brown on the bottom. These look underdone when actually they are ready. ENJOY!


I apologize for the fuzzy pictures. These pictures were taken on my super old camera that I got in 2002.

Please let me know if you make these and how you liked the recipe! You can exchange out the filling for raisins, currants, apples, almonds, raspberry jam, you name it! Oh and these are great for breakfast :)


Recipe:
Rugalach

1 cup unsalted butter
8 oz cream cheese
3/4 cup granulated sugar, seperated
1/4 tsp salt
3 egg yolks
1 tsp vanilla extract
2 1/3 cups All Purpose Flour
4 oz walnuts
1 T ground cinnamon
2 Cups semi-sweet chocolate chips
1/2 cup Apricot Jelly

Sunday, March 21, 2010

Day 3: Long Time Coming

I have some serious explaining to do! But in efforts to keep this blog as little about my personal life as possible, I'll try to summarize and move on to the baking stuff! I did not want this blog to be something I did wholeheartedly a few times and then stopped without ever completing it. But you know how it is... life gets in the way. I've gone through a few life changes since my last post and it was tough to get back on track but now I'm back! I am no longer baking professionally and I have renewed my pure love for baking (and eating) in doing so. I am refreshed, renergized, and ready to continue on with this pastry project endeavor!

So I actually made a couple of items from Sherry's book "Desserts by the Yard" with pictures of my making it and everything. However, like I said life had its interruptions and I just never posted about it. So... about 7 months later... here it is! lets see if I can remember making these.

You might have noticed I keep saying I "made" these items. Thats because I don't consider these to be baked. They were created, yes. And they are pastry items, yes. But I can't quite say that I "baked" a strawberry soda, can I?

We are still in the section titled "Brooklyn Inspirations" where Sherry grew up. These are some of my favorite desserts - not too frilly, not too french, VERY American (or Italian/American). The first recipe is for Grandma's A&P Strawberry Sodas. It calls for homemade strawberry ice cream and strawberry soda. YUMMY! Think root beer float that is fruit inspired. This is NOT my favorite ice cream recipe. Actually I don't count it as ice cream per say because it does not contain any egg. Its more like a sherbet. It contains fresh fruit, heavy cream, milk, sugar and water. Its boiled together, then blended in a food processor. Then you let it cool, and spin in your ice cream machine. I have the Cuisinart ice cream machine with the removable freezer bowl. I like it, it does the trick. The only problem is that when you are impatient (ahem like ME) and do not wait for the mix to cool completely, the freezer bowl is not cold enough to properly spin the liquid into ice cream. So I ended up over spinning my ice cream which resulted in an icy, overly aerated ice cream.
Oh and i also had a little explosion in our food processor. I guess our processor is a little on the small side. oops. Before shot:


After Shot:

To finish this dessert, scoop a few scoops of the ice cream (once frozen) into a cup and pour with strawberry soda. Sherry suggests adding a splash of grand mariner b/c hey, grand mariner makes everything just a little bit better!

I wish I still had a picture of the finished ice cream/soda but... it was 7 months ago and I just dont have it anymore. This is the best I can do for now! I am gonna stick to my usual ice cream recipe though - a classic creme anglaise - YUMMY!


The next recipe is for a "Pussycat Cafe Gelee Parfait". Fun to say but not so fun to eat. At least not for me, I have an aversion to jello and any gelatinous desserts not containing chocolate! This dessert requires a lot of patience, which as previously discussed, I do not have. It calls for making layers of a jello type parfait, one at a time, and waiting for it to set before making the next layer. Which is why my entire parfait looks like its all the same color.


And yes, that is a margarita glass. Which also makes a great individual parfait glass!

This dessert was actually pretty good, and that is saying a lot since I don't eat fruity, jello desserts. Its made with all fresh fruit. The first layer is a Watermelon/lemon, the second is a pure lemon, the third is a strawberry with lemon and orange juice, and the last layer is an orange with a little lemon. The overall affect should be very orange and yellow layers with a hint of red in the center. Very beautiful and nice for in the summer. I was lucky that at work we were using fresh watermelon rind for a salad and had tons of extra watermelon chunks for me to take home.

I prefer the more American style desserts - overly indulgent, rich, chocolaty, exciting. Extremely bad for you. If you look at any European baking books or magazines, especially the ones aimed towards professionals like "Dessert Professional Magazine" you will see what I mean. The French style desserts tend to be molded mousse or gelee's like this one, and the latest trends are foams and gastriques and, well, desserts that remind me of the Jello cups I ate as a kid when I was sick and couldn't stomach anything else. But if you like jello (like my fiance) then you will gobble up this dessert (like my fiance did!).

These are not the most exciting desserts (I guess that is subject to opinion, but for me, they weren't too thrilling to make) so to supplement that I will add another post soon of some other baking I've been doing, including a carrot cake decorating tutorial with marzipan carrots!

Until then, stay sweet!

Wednesday, August 12, 2009

A&S Cheesecake

So yesterday morning I got the cheesecake from the fridge where it set up overnight. This is an argument in the pastry world, how to properly set up a cheesecake. Some leave it out at room temp for 4-6 hours, some overnight, and some in the fridge overnight. This recipe calls for a combination. Leave out at room temp for 2 hours, then in the fridge 4-6 hours. I let it sit in fridge overnight before unmolding it. It was really soft, maybe too soft.

I would have liked to bake it for maybe 5-10 minutes more but I am following Sherry's directions EXACTLY for this project. It could also be that I am not used to such a traditional cheesecake. It is incredibly dense, but perfectly sweet. Also you can taste the curds from the farmers cheese b/c I did not strain the cheese like Sherry suggested. I have seen farmers cheese come in many varieties - blocks, some with more liquid, really curdled looking, etc. This one seemed too thick to strain. It came in a block but was soft almost like ricotta. I thought straining it would get too messy and wouldn't be worth it but I admit I should've done it. So much for following her directions exactly!

Here is a picture of just how soft it is...
you can see how crumbly it is on the inside. I ate the piece I sliced before I could take a picture of it :) i guess i was just too excited about trying this cheesecake to stop and take a picture.


Well I'm hoping to get to the next 2 recipes today or tomorrow, but I am working 10-12 hour days at work this week (it is restaurant week here in houston and we are busy!) and don't even have time to go to the grocery store. But this project is a priority and I will make the time to do more projects, if not soon then on my next day off on Sunday.

Thanks for reading and I'll keep you posted!

Monday, August 10, 2009

Day 2: Brooklyn Continued

Today was a super long day but since it is my last day off for another 5 days, I knew I had to be good and bake more for the project! So it is now 11:22 p.m., I have to work in the morning, and I still have a cheesecake in the oven. Ce la vie :)

And I've just realized how expensive this endeavor is going to be. I can find ways to cut some corners, but today I spent $7 just on jam. And I only needed a tiny bit. Guess we're having pb&j for dinner the next few weeks...

One of the next two recipes in the Brooklyn section was an authentic New York style Cheesecake which Sherry calls the "A&S" cheesecake, named after the department store where her mother used to take her shopping as a kid, and get cheesecake afterwards in the downstairs area of the store. I think I'd love any clothing store that sold cheesecake. Think about it, you go to try on bathing suits, get depressed, and go get a turtle fudge cheesecake. Mhmm... I think chocolate and sugar are the best end to any day, good or bad. And if Sherry's shopping experiences as a child were anything like mine were, her mother deserved a great big ole piece of dessert after shopping with her children. I can't tell you how many tantrums I threw at Palais Royal and JC Penny's growing up. I think I'm still banned there.

So the cheesecake is still in the oven so no pictures yet, and I cant really comment much except that I am super excited to try this cheesecake because it is made with farmers cheese. Any of my Greek family members reading this are probably going "oh neat!" right about now. We grew up on Greek food made mostly from farmers cheese. Although this recipe also calls for sour cream, cream cheese and heavy cream. I have never made a cheesecake with heavy cream and have wanted to try out recipes that use it to see if its any better than those made without it.

Surprisingly, the cheesecake was SO much faster to make than the other recipe I made tonight - rainbow cookies. I have seen these cookies in many new york style bakeries and was eager to try them out. However, Sherry converted this recipe to a cake instead of a cookie. And oh my gosh. They are good. I could put some exclamation points after that sentence but I know me, and I would over do it on the exclamation points (DOUBLE EXCLAMATION POINTS! - seinfeld reference, sorry)... Anyways they are basically an almond cake and I love love love anything almond flavored, especially if it uses almond paste, which this recipe did. I love the smell of almond paste. But I did not read the recipe correctly and only had enough almond paste for a 1/2 recipe, so thats what I ended up making.

The original recipe yields 80 pieces and frankly I do not need 80 pieces of almond cake in my house anyway (my wedding is 13 months away!) and since I didnt have the paste it worked out. This recipe calls for one cake mix, divided into three parts and dyed three colors, hence the name "rainbow cookies". They end up more like petit fours, glazed with chocolate icing. I didnt have the grand mariner for the icing (which I see I will need for future recipes so I may need to go to the liquor store soon) so at the suggestion of my wise friend mandy I added amaretto instead. YUM!


obviously I didnt divide them out evenly :) but there is also so little of the yellow layer because I did not have enough of the right size sheet pans and had to use one that way way too big. Apparantly I do not have enough pans, and I'm not kidding you I think I already own atleast 15. Of assorted shapes and sizes.

So I will have to post pictures of the cheesecake after its done baking and after its refrigerated overnight, maybe in the morning if I have time before work. I'm curious about it also because it does not have a crust! Its just pure cheescake. I'm a fan of crust on anything - cheesecake, tarts, pies, whatever. So we'll see. And after that, the next 2 recipes are drink recipes which should be interesting.

Man I'm already craving more of the rainbow cake... this is bad news...

Sunday, August 9, 2009

Day 1: Brooklyn

Today was the first official day of the Paula's Pastry Project, and I have to say, it was kind of a disaster. Which is really embarrassing because, well, I do this every day. And I get paid to do this. All I had to make was a simple birthday cake and a batch of no-bake cheesecakes. But I did learn a very valuable lesson. Baking is so much easier when you start with a clean, organized kitchen.

I did not start with a clean kitchen. I started with dishes in the sink that my fiance, Michael, should have done days ago (sorry sweetie but ya should've) and clutter on the countertops, which don't have a lot of space to begin with. I was a mess.

To begin, I made the first recipe in the book from the first chapter, titled "Brooklyn Inspirations". I have to say I am most excited about this chapter (& the academy awards chapter, its a tie) because New York pastries are iconic, a staple in today's American pastry world. Sherry introduces the chapter with a few pages on her childhood in Brooklyn. And when you think of pastries or desserts from your childhood, what do you immediately think of? Birthday cake. Of course. Everyone's had it, atleast one made by mom or grandma or aunt-whoever. Great way to start the life and times of Sherry Yard.

Back to my mess. First off, as I'm pouring ingredients from a measuring cup into a running mixer, my hand somehow loses grip on the cup and it falls into the mixer going clunk-clunk-clunk until I clumsily realize what is going on and turn off the mixer. In my hurried attempt to turn off the mixer, I knock over the open bottle of vanilla extract sitting on the counter and it gets all over my t-shirt and all over the counter. And it was a brand new extra large bottle of vanilla, and I'm stingy when it comes to extracts. Anyways I ran and got my camera to take a picture (but it was out of battery so by the time I got it to work, the vanilla set in so much that the countertops are now semi-permantely stained and need to be bleached.

Isn't my mixer beautiful? I still haven't named her yet, but I'm thinking of naming her Susan after my two Aunt Susan's who bought it for me :) Best gift ever!

Anyways, I managed to finish the birthday cake. Its a simple white cake made with whole eggs and plain milk. Although I love most of Sherry's recipes, this one is not my favorite white cake. SORRY! I do know that I tend to overbake this cake (I have made this before). It does not brown on the tops like most white or yellow cakes. So it looks raw when its actually ready. It came out pretty dry.


I also am not crazy about the icing. It has two ingredients - butter and chocolate. Its a little too much for me. I prefer a light swiss buttercream. This icing is also very soft like a ganache, and I prefer a thicker icing for birthday cake.

Here is the finished product!


The second recipe in the book is no bake mini cheesecakes with a nilla wafer crust. They were delicious! And so simple and quick to make! Definitly a keeper recipe!
They were a little soft cause I didnt let them set up properly before eating them. I also didnt pulse the nilla wafers cause I was lazy and didnt want to have to clean up the food processor. So I turned them into crumbs by hand, which might be why they didnt stick together at all and were very, well, crumbly. And hard to eat. But that didnt stop the ladies at the knit shop from eating them and licking the paper liner clean, literally!

All in all, a good start to my project. Can't wait for the end of this chapter where I get to make pretzels!

Oh and I must introduce my helper, Joey.
She is always at my feet while I bake.

Saturday, August 8, 2009

Paula's Pastry Project Begins!

Okay I'll admit it. I didn't come up with the idea for this project out of desperation or even an eagerness to learn, but out of inspiration. After seeing the "Julie/Julia Project" movie, I started thinking... what is the quintessential pastry book? Is there even a book that is the go-to reference for all things pastry, all things carbfully sinful? Julia Child's cookbook has stood the test of time to teach us silly Americans how to attempt to master the art of french cooking. But what about pastry?

I even researched this online. I googled "best pastry book." The more books I clicked on on Amazon (many reviews calling each book the "best"), the more I realized I didn't like any of these books. And the more I realized how into this idea I was. I could seriously do this; I could bake my way through a cookbook.

Before I get ahead of myself, let me tell a little bit about me. I grew up around food. For one thing, I'm Jewish. For another thing, I'm Greek. I was genetically predisposed at birth to love food. We always had a fully stocked freezer of ice cream at home (Blue Bell, to be exact) and I'm pretty sure I was making chocolate chip cookies on my own by the time I was 9. Actually, most of the time I just made small portions of the dough and ate it raw. Cause I could. In my 25 years, I must have eaten about 10 pounds of raw cookie dough - so far - and I can thankfully say I must be immune to raw eggs cause I've never had as much as a stomach ache from cookie dough.

Its been my dream since forever to open a bakery of my own one day. This used to be my pipe dream, but suddenly its become reality. After attending culinary school and earning a certificate in Baking & Pastry, I went on to work for Hyatt Hotels as a pastry cook. I am now (2 years later) a pastry chef at a fine dining seafood restaurant here in Houston, Texas. Hard to believe. In fact, on most days I don't believe it at all. Which is why I think I need this project.

I need to reaffirm that this is what I love to do. Well, okay, I know I love to bake, but is it something I want to make a career out of? I need to rediscover my passion for taking flour sugar eggs and milk and making something out incredible that can save a ruined day.

So back to my search for the book. While searching for the "best" pastry book, I researched who the best pastry chef is, was, or ever has been. Most award winning chefs I found I have never heard of, and those who's names I recognized, did not have a book worth baking through (in my opinion). I decided then and there that in order to remain passionate about this project, I would have to be following a great book by someone I admire. There can only be one person who fits that description.

Sherry Yard.

If you do not know of her, look her up. She's incredible. No, I have never met her but I have dreams of working as her assistant one day at the academy awards (she makes the desserts each year, although I'm not sure if she still does this). Although her career is still booming as the pastry chef for Wolfgang Puck's concepts, I will be following her career so far through her book "Desserts by the Yard."

In this cookbook, she begins each chapter of recipes with a brief description about her career and where it took her. The book begins with her childhood memories in Brooklyn, and ends with her doing the Academy Awards desserts. To think that by the end of this project, I can be recreating desserts from one of the most prestigious events of the year - wow. Now that will be a confidence booster.

You'll understand with each blog post just how wonderful Sherry Yard is, and you'll see why she is my all time favorite pastry chef. Her story is incredible. When I first got this cookbook, I read it before bed like it was a memoir - because in a way, it is. It is her life story, told through simply sweet recipes.

Because that's what life is. Simply Sweet.